Transform your kitchen or bathroom in a single afternoon with a peel-and-stick backsplash: the most buzzed-about Home Maintenance solution of 2025. Not only does it deliver instant style on a DIY budget, but peel-and-stick tiles offer stress-free installation—no messy grout or professional help required. Discover why this simple upgrade is redefining DIY Fixes and making home transformations more accessible than ever.
Why Peel-and-Stick Backsplash Projects Are Trending
More homeowners than ever are seeking smart, budget-friendly DIY Fixes that elevate their spaces without draining their wallets. Peel-and-stick tiles fit this need perfectly—these adhesive-backed panels go up quickly, require only basic tools, and can dramatically enhance kitchens, bathrooms, laundry areas, or mudrooms.
According to Angi's 2025 State of Home Spending report, 36% of homeowners are prioritizing routine Home Maintenance, with easy, self-directed upgrades like backsplashes leading the way among all age groups[1]. Peel-and-stick products enable everyone—from renters to long-time property owners—to chase big style without big renovation costs.
The Real Numbers: DIY Value and Success Rates
Upgrading a kitchen backsplash professionally can cost anywhere from $1,000 to $3,000, depending on materials and labor, while peel-and-stick options can deliver a striking effect for under $150 in materials.[1][3] With 56% of DIYers reporting successful outcomes for first-time home repair projects (U.S. Census Bureau, 2024 Housing Survey), more households are confidently tackling simple upgrades with proven results.
Meanwhile, the annual average homeowner expenditure on all home renovations in North America has climbed to $13,000 (Flex Seal Canada, 2025), highlighting how budget-friendly projects can help balance rising costs[5].
What Makes Peel-and-Stick the DIY Winner of the Year?
- Effortless Installation: Most peel-and-stick tiles require only a tape measure, level, and scissors. No tile saws, no adhesive, no battling grout haze or drying time.
- Time-Saving: A single wall can be covered in as little as 2-4 hours. It's a true weekend project—or even less.
- Low Commitment: Renters love peel-and-stick options, as they're removable without damaging walls, making them a safe upgrade for temporary spaces.
- Limitless Style: In 2025, the trend has expanded beyond classic subway tiles to include bold geometrics, marble-look patterns, textured wood, metallic finishes, and eco-conscious materials[3][4].
- Affordable Impact: Swap boring, stained, or outdated walls for a designer look without professional fees—perfect for Appliance Repair zones, backsplashes near sinks, laundry areas, or crafting corners.
Material Selection Guide: Choose with Confidence
- Peel-and-Stick Vinyl Tiles: Lightweight, flexible, and moisture-resistant, making them ideal for kitchens and bathrooms. They typically last 3-5 years with normal wear.
- Peel-and-Stick Glass Tiles: Offer more texture and a polished finish but require more care during installation, as they’re heavier and can crack under pressure.
- Thermoplastic and Metal-Look Tiles: These bring a modern or industrial feel and can handle higher heat, making them suitable behind stoves—just check manufacturer temperature ratings.
Most tiles are safe to clean with gentle, non-abrasive household cleaners. Always check cleaning instructions to avoid damaging adhesive and color.
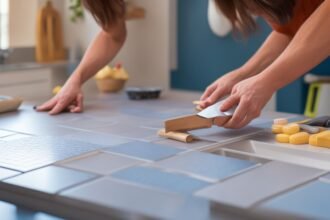
Step-by-Step DIY: How to Install a Peel-and-Stick Backsplash
- Prepare the Surface: Clean the area thoroughly with soap and water—no grease or residue. Let dry completely. Surfaces must be smooth; patch holes or sand bumps as needed.
- Measure and Mark: Use a level and tape measure to mark your starting line. Map out outlets or obstacles that may require tile trimming.
- Layout Dry Fit: Arrange the tiles in your desired pattern on a flat surface. This ensures you have enough tiles and helps plan for tricky corners or edges.
- Peel & Stick: Begin at your starting point, peeling off the backing and pressing tiles firmly onto the wall, working out any air bubbles. Line up patterns carefully—precise alignment makes a professional-looking finish.
- Trim to Fit: Use sharp scissors or a utility knife to trim tiles around outlets, cabinets, or edges. For thick glass or metal tiles, a tile cutter or miter box may be required.
- Seal Edges (Optional): For extra moisture protection, run a bead of clear silicone caulk along the bottom edge where the backsplash meets the counter.
Safety Precautions and Smart Habits
- Wear Safety Gear: When cutting tiles, especially glass or metal, wear safety goggles and gloves to prevent injuries.
- Ventilate the Workspace: Adhesive products can off-gas. Open windows or use fans to keep air fresh during installation.
- Read Product Labels: Not all peel-and-stick tiles are heat- or water-proof. Always check ratings for kitchen use, especially near stoves or sinks.
- Follow Disposal Guidelines: Recycle off-cuts and backing sheets where facilities exist. Reduce landfill waste by saving usable scraps for repairs or creative projects.
Budget-Friendly Alternatives and Advanced Tips
- Painted Faux Backsplashes: For ultra-low budgets, tape off a backsplash shape with painter's tape and use high-quality, scrubbable paint to create a fresh accent wall.
- Removable Wallpaper: In dry zones (like coffee bars or craft nooks), pattern-rich removable wallpaper can deliver flair without the expense of tiles.
- Layered Lighting: Boost your DIY upgrade’s impact by installing battery-operated under-cabinet lights along the newly tiled wall. It enhances ambiance and makes kitchen tasks easier—no electrician needed.
- Go Beyond the Kitchen: Use leftover tiles to protect mudroom walls, laundry spaces, or pet feeding zones from water splashes and dirt.
Preventative Maintenance: Keep Your DIY Looking Fresh
- Clean spills promptly: Wipe away splashes with mild soap and water—avoid harsh abrasives that can scratch tiles or dissolve adhesive.
- Inspect for loose edges: Press back any lifting corners and add a dab of strong, clear adhesive if needed.
- Monitor for moisture: In high-moisture areas, periodically check for condensation or leaks. Promptly repair plumbing or appliance issues to prevent hidden damage.
Sustainability and Upcycling
Eco-conscious DIY enthusiasts can seek out tiles made from recycled vinyl or glass, or opt for re-usable products if a future move is likely. Peel-and-stick solutions minimize construction waste, as there’s no need to remove or trash existing tile—simply apply over clean, flat surfaces for a reversible makeover.[4]
Three Practical Tips for Success
- Practice First: Test a small section behind an appliance to build confidence before starting on a highly visible wall.
- Use Proper Tools: Invest in a level, a sharp utility knife, and a straightedge for crisp, professional results.
- Take Your Time: Patience ensures clean lines and tight seams—avoid rushing and step back regularly to assess your progress.
Inspiring Room-by-Room Ideas
- Kitchen: Refresh around your stove, sink, or coffee station with metallic, marble-look, or whimsical geometric patterns.
- Bathroom: Combat humidity and mildew with moisture-resistant vinyl or glass options behind sinks, near tubs, or above vanities.
- Laundry/Mudroom: Shield walls from splashing detergents or muddy shoes—practical for high-traffic family homes.
- Pet Corner: Easier cleanup of pet messes—simply wipe down the splash zone behind feeding bowls or litter stations.
Final Thoughts: DIY for Every Homeowner
Upgrading your home with peel-and-stick backsplash tiles empowers you to create beautiful, functional spaces on your schedule and budget. This Home Maintenance trend exemplifies the best of today's DIY Fixes—a blend of style, function, troubleshooting ease, and budget-friendliness, accessible to beginners and design lovers alike. Whether you're tackling Appliance Repair zones, cleaning up pet messes, or simply craving a quick refresh, you have the tools to succeed. Roll up your sleeves—your next home transformation awaits!