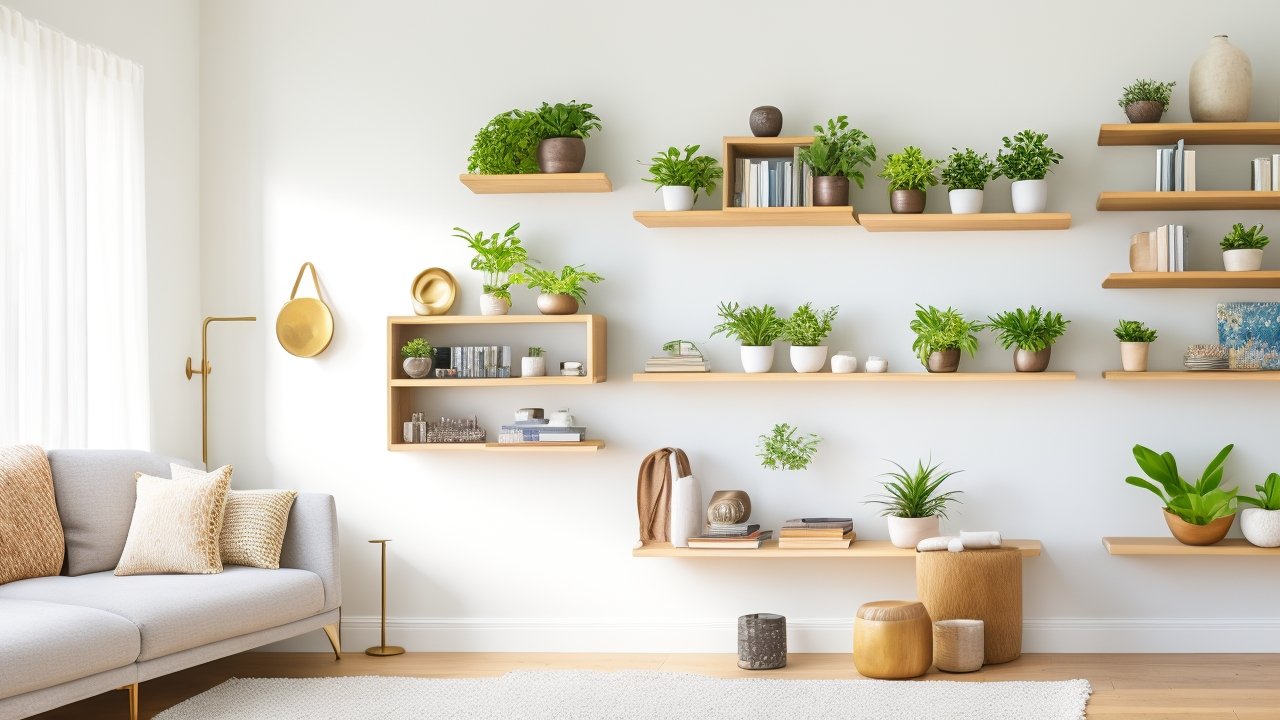
Looking to upgrade your space, boost organization, and save money? DIY floating shelves are a stylish home hack that combines form and function while placing your personal stamp on any room. With minimal materials and simple steps, floating shelves offer homeowners a budget-friendly way to transform walls into showpieces and storage.
Why DIY Floating Shelves Are Trending in 2025
The DIY projects trend continues to surge as more people look for ways to improve their homes efficiently and affordably. According to a 2025 industry survey by This Old House, over 56.4% of homeowners are planning flooring or shelving upgrades this year, reflecting a major shift toward accessible step-by-step home improvement projects[source: This Old House][2]. Likewise, cosmetic upgrades—including new shelving—are top priorities for 46.9% of households, making floating shelves both popular and practical.
Floating shelves offer a sleek storage solution that maximizes space without bulky furniture. Whether it’s displaying books, plants, kitchen accessories, or personal art, DIY floating shelves can be customized to fit every style and room.
Benefits of Installing DIY Floating Shelves
- Space Optimization: Ideal for small rooms and apartments, floating shelves create storage without occupying valuable floor space.
- Budget Friendly: Many DIY floating shelf projects cost under $100, especially when using reclaimed wood or low-cost hardware[source: Twin Cities Habitat for Humanity][3].
- Customizable Design: Choose materials, colors, and configurations to match your decor or express your creativity.
- Easy Step-by-Step Installation: Most projects can be completed in a weekend with basic tools—perfect for DIY beginners.
Essential Tools and Materials
- Wood planks or shelves (pre-cut or reclaimed)
- Wall anchors and brackets (hidden mounting for true floating effect)
- Level, drill, screws, and pencil
- Paint or stain (optional for customization)
- Safety gear: goggles, gloves, mask
Step-by-Step Guide to Building Floating Shelves
1. Plan Your Layout: Measure your wall and mark the desired shelf location. Consider what you’ll store or display to determine shelf length and depth.
2. Prepare Materials: Sand wood planks for a smooth finish. If painting or staining, allow adequate drying time.
3. Attach Brackets or Supports: Use a level to ensure shelves will be straight. Install wall anchors and hidden brackets securely—studs are preferred for weight support.
4. Mount Shelves: Slide shelves onto brackets. Test stability and adjust as needed.
5. Style Your Shelves: Add decor, books, or kitchenware. Mix heights, colors, and objects for visual interest.
Tips for Success: Safety, Materials, and Style
- Safety First: Always wear safety goggles and gloves when cutting wood or drilling. Secure shelves into wall studs for heavier items.
- Choose Quality Materials: Use solid wood or durable plywood for long-lasting shelves. Low-cost options—like reclaimed lumber—can add character and reduce expenses.
- Check Weight Capacity: Be realistic about what the shelves will hold. Standard floating hardware supports 15-50 pounds per shelf, but verify with your kit or hardware store.
Creative Variations and Home Hacks
- Kitchen Hacks: Install small floating shelves for spices or coffee mugs, freeing up cabinet space.
- Bathroom Storage: Use moisture-resistant materials above the toilet for towels and toiletries.
- Entryway Organization: Mount a shelf for keys, mail, and a small basket to declutter your drop zone.
- Kids’ Rooms: Create colorful shelves for toys and books, encouraging easy cleanup and display.
- Living Room Displays: Arrange art, plants, or collectibles for a gallery wall effect.
Budget Breakdown: Affordable Home Improvement
Floating shelf DIY projects exemplify budget friendly home improvement. Even substantial shelf installations frequently cost less than $100 for materials. With some creativity and shopping at local supply stores or reuse centers, you can further cut costs and empower sustainable upgrades[source: Twin Cities Habitat for Humanity][3].
What the Numbers Say: DIY Projects and ROI
Recent market reports indicate that minor home improvement projects—including shelving and cosmetic upgrades—deliver stronger return on investment than many major renovations. For example, the National Association of Realtors found that simple upgrades like fresh paint, shelving, and improved lighting yield some of the highest resale value increases for 2025[source: This Old House][2].
Common Mistakes to Avoid
- Skipping the Studs: Avoid mounting shelves just in drywall for weight-heavy storage—always locate the studs for secure installation.
- Poor Planning: Measure twice, drill once. Uneven or poorly placed shelves detract from both style and function.
- Ignoring Safety: Use protective gear when sawing or drilling, and follow all tool manufacturer instructions.
Motivating Reflection: Your Space, Your Style
Floating shelves prove that DIY projects can be transformative—even on a budget. Whether you’re a home improvement veteran or trying your first step-by-step upgrade, this project is a rewarding, practical way to express your creativity and make the most of your space. Today’s home hacks are about smart solutions, style, and personal satisfaction. Now is the perfect time to roll up your sleeves and give your home a functional, beautiful boost—with DIY floating shelves, the possibilities are endless. Ready to take action and create storage that’s both stylish and budget-friendly? Start your project today and realize the joy of DIY success.